Lesson Two – Adventures in Beading.
Posted on: 15 February 2009
- In: quilting
- 4 Comments
I can’t believe how quickly time goes by. Lesson 4 of the online Beading Class was just posted on Friday, and I haven’t even written about Lesson 2. So here goes.
Lesson 2, I was so excited over. Well, truth be known, I’ve been excited each week, when the next lesson has been posted. I practice some of the techniques on my sampler, and I have even added a few to my Beading Experiment project. (Sorry no photos of that, until after our quilt show – a surprise for my fellow guild members).
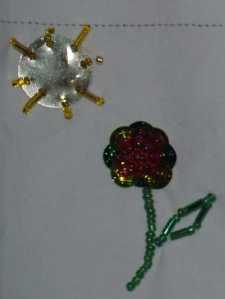
Lesson 2 had several “neat” things. Fringes, a barnacle, stacks, and beading with sequins. I made my barnacle into a rose. Perhaps not the expected use of this technique, but it leant itself to it.

The barnacle is made by stitching 7 stacks (3 beads largest to smallest on top of each other), and then threading the top (stop) beads and pulling taut. The stacks pull inwards. With my Barnacle rose, I used 2 different green sequins as the “bud leaves” under each stack.
The stem is using a couched stitch. The sun is a largish sequin with seed beads and bugles making up the sun rays.

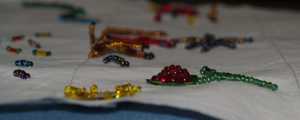
 These photos are side views of the barnacle.
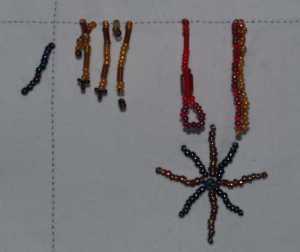
Then it was on to fringes. These were so much fun. You can “end” the fringe in any bead design you like. The last fringe is called “double fringe”. You thread a number of beads, add your stopper bead, and then go back up the fringe, by adding 3 or 4 beads, then going back to a bead, then adding more beads, and going back, all the way up, until you reach the beginning of the fringe. I used two colours to really show this technique off. If you play with the beads a little, you can make them look like they are spiralling up the long fringe.
 As you can see in the photo, fringes have to be somewhat “long”, or they do not hang well. The 4th gold coloured one does not hang very well at all. The “starburst” or “fireworks” beads, are fringes, with the stop bead stitched down to the fabric. Spiders on Crazy quilting are sometimes made using this technique.
My last part of Lesson 2, was somewhat straight forward, and also a little frustrating.
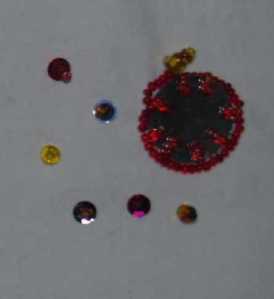
The stacked beads went well. I even added a sequin here and there to jazz it up. The couching around a larger sequin did not go very well for me. My beads “bubbled” up, which was probably because my tension was to taut. My photo is a little fuzzy at this end. And on top of everything, my larger sequin ended up situated much too close to a stacked bead.

Working with the sequins was a lot of fun, but at this point, I don’t see a use for them in my quilting projects. But I am not going to say never. A year ago, I didn’t think beading would ever become part of my quilting. You just never know what happens.
Not all quilts are meant for quilting. If you make wall-hangings or art quilts, consider adding a little beading. Not sure if the colours of the beads go with the quilt. Scatter a few over it.
Consider going up. What if you started with a larger bead, then added another, slightly smaller, and another even smaller? Instead of using a bugle, how would a square bead change the look.
As you are beading, be sure to take a little back stitch on the back or within the “sandwich”, just in case the thread weakens and breaks, rebeading 20 beads is much better than having to rebead 200.
Our guild has a library, with all sorts of books. One of them is Beading Basics – 30 Embellishing Techniques for Quilters by Mary Stori. The cover of the book is great! Beads around buttons. Fringes and so much more. If you are not able to take a class on Beading, I highly recommend this book. Even if you do take a class, I would still recommend it.
One of our guild members leant me a few of her books. One of them I had found on the internet, while I was looking for information. I thought it would be a great addition to our guild library. If you are looking for a book that has projects to do, as well as some gorgeous photos of beaded items, then Beaded Embellishment by Amy C. Clarke and Robin Atkins (Amazon has a neat feature, where you can see actual pages from a book) would be the one you are looking for. It does have a technique section, but for a beginner beader, this book may be a little too much.
Two absolutely beautiful books come to us from the UK. Bead Embroidery by Valerie Campbell-Harding and Pamela Watts, and Bead and Sequin Embroidery Stitches by Stan Levy, are absolute eye candy for beaders. The first is primarily on clothing, but the techniques can easily be done on quilted projects. The second book is a play-by-play. Some basic techniques, and then different variations of those techniques. He even discusses making one’s own designs.
The last book is by far my favourite. Embeadery – Using Classic Embroidery Stitches in Beadwork by Margaret Ball. It doesn’t have the glossy beautiful coloured pages like the others, but it is a technique enriched book. I believe it allows you to choose your colours, and allows you to imagine how different colours would work. Have you ever seen a project, and then had difficulty imagining it in any other colour? Some books and people, I suppose are limited to just a few simple techniques. This book takes embroidery stitches and turns them into beautiful beaded versions. She has a section of colured pages of stitches as well as a few projects. What I really like about this book, is it is NOT project based. If you were to get only one book on beading, I would highly recommend this one. It is a great beading reference book.
-Alice
4 Responses to "Lesson Two – Adventures in Beading."
I could see why you might get a bit frustrated, I think that’s why I hesitate to try it! I do love beaded fringes though, and would someday like to make a beaded purse with a fringe along the bottom – but when?! 😀
I’m glad you’re still enjoying your classes, and look forward to the next instalment.
Jen 🙂
Hi Alice,
It looks great to me. Everything takes practice. I think once it becomes second nature, you will have everything beaded. Think you are doing a wonderful job.
Debra


16 February 2009 at 1:55 am
There can be no limit to embellishment using this technique. Beading has so many applications. Having seen beaded quilts at exhibitions I can attest to their breathtaking appearance. Along with machine embroidery using those fasntastic decorative threads, I’m sure you could make the most amazing quilts/art quilts. I’m looking forward to where this type of decorative art takes you. No wonder you’re having so much fun!
Happy Stitchiing…Ann 🙂