Posts Tagged ‘snowball quilt’
- In: quilting
- 10 Comments
It started about two years ago, a challenge among quilting friends (sadly, I don’t even recall what the challenge was). It was also a good opportunity to try the leaders and enders that Bonnie K. Hunter recommends. If you haven’t heard about leaders and enders, I recommend you read Bonnie’s blog on the subject.
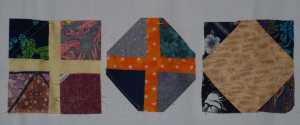
I decided for the challenge I wanted to make a scrappy masculine feeling snowball quilt. I had lots of 3″ squares, I could use. I then started scrounging for 7″ squares. Cut down some of the 10″ squares to get a 7″ and a few 3″. So as I worked on other projects, I would stitch one of the 3″ squares to the 7″, and away I went.
At some point, I figured I’d better count how many completed blocks I had, and how many more of each (needed alternating dark and light blocks), I needed to complete. I wanted to get this quilt done, so it became a non-leader/ender project.
A few weeks ago, I was in a position to start stitching the blocks together. I think it was an Eleanor Burn’s video I saw that described how to piece the blocks together by columns, instead of stitching each row together. This method you do not trim the blocks apart. As you stitch all the columns together, the rows are “attached”, and you just pin and stitch them together. I found it worked very well. I had to unstitch some of the chain stitching, as my first 2 rows got twisted somehow. Was easier to snip the chain stitching, instead of trying to untangle them. Stitching the blocks together in this fashion works very quickly.
As I was finishing up the blocks, I started to realize I did not have a plan for the borders. I wanted to carry on with the scrappy theme, and use from my stash. I don’t have enough yardage of any one fabric. But an idea started to form. When I was stitching the blocks I added another line of stitching 1/2″ (approximately), from the required stitching line, then trimmed the Half SquareTriangles, to create them. I was sure I would use them somewhere, sometime down the road. I can use the “leftovers”.
The last couple of days, I’ve been trimming and pressing all those leftover pieces. The smallest piece was about 2″, and the largest about 2 1/2″. I decided to trim down to 2″.
Now that I have done that, I have not measured the top as it is now. To be honest, I didn’t even square up the blocks, and I realize now I probably should have, but it is a scrappy quilt, and I’m not overly concerned if the seams match up or not. The concern is the actual size of the top as it is now, and if it is “square”. I think I may have a couple of wobbles in it. Ah well, it is going to be a utility quilt, I think. Something I can practice my Free-motion quilting with.
I decided I wanted to do a “floating” type border. Now that I decided I was going to use those leftover pieces, I thought it would be neat to float them. To me this means having the same colour of fabric pieced around the scrappy blocks, to make them as if they are floating on the border fabric. Opened the stash cupboard to see what I had that would be appropriate. Again thinking scrappy. I didn’t have enough of anything really to work. I did have some fabric, three pieces of that were all the same shade. I took them out, pressed and trimmed to 2″. I then happily sat down at my sewing machine, and proceeded to stitch the HSTs to the strips of fabric. I cross-cut, and came up with another idea.
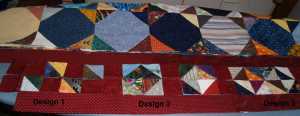
Design 1 on the left, Design 2 on the right
I wasn’t so sure now about the floating squares. I had only really seen them on black fabric, and typically bright fabric was used.
Then I thought about stitching four of the stitched squares to each other, putting all the lights in the center for one unit, and darks in the center for the other, with a spacer of the border fabric between each unit. This pattern copies the patterns of the blocks. I had every intention of following that idea.
Design 2 on the left, design 3 on the right.
Then another idea hit me (Design 3). What if I was to create the same design of the small triangles from the snow ball blocks. Alternate the dark and light to create the same design, and then drop the spacers completely. I could then mix up the border fabric to make is scrappy. Granted, cutting them into 2″ squares is going to make a lot of work, but I think it will continue with the scrappy theme of the quilt.
Deisgn 1, Design 2 and Design 3.
So this is where I’m at. The more I look at Design 3, the more I like it. I think it is also called “Broken Dishes” block. I will use the dark red strips for the inner and outer border, maybe I will piece 4 of the triangle units together (4 patch), and then when I have a pile of them, stitch to the border strip (width of fabric), and then crosscut. The border pieces will then be 3 1/2″ long, or 3″ long when finished. That way, I don’t have to cut 2″ squares, and try to get them aligned nicely.
I may have to throw in some “spacers” to get the borders to fit the top. Or, maybe I will just trim the blocks to make it fit. If they don’t line up, I’m okay with that too!’
So what do you think? Would you have stuck with your first idea, or would you have let the creative juices flow, until something else came up.
-Alice
PS – I bet you didn’t expect a second post from me so quickly! Me neither, but I wanted to share. I have been feeling really good the last few days. I can only work an hour or two at a time, but it feels good. So I stitch, press, trim for a bit, then when I start to feel “it”, I go and rest for a few hours. Then I’m back at it. This process is doing me good. Although the brain is still doing the “GO GO GO”, at least now I’m listening to the body and when it starts going “NO NO NO”, I’m stopping!
Thank you all for your comments. Your support has definitely raised my spirits up!


