Two years… really?
Posted on: 26 February 2015
- In: quilting
- 8 Comments
One one hand, not much has happened in the last 2 years, since my last blog post.
New laptop, the other I had for 7 years, finally decided it had enough.
I have not done much quilting
I was quickly reading my last post, and I still have not finished that latch hook rug, although now it is about 60% completed.
I miss sharing my work, so I am going to work hard at trying to write more often.
Hope you are well.
-Alice
Ramblings…
Posted on: 31 January 2013
- In: quilting
- 7 Comments
Well hello,
I am still around, not doing much, as energy levels are still low. But that will pass.
I have been working on a few things… even worked on beginning cleaning up the quilt’n room, it is amazing, how much “stuff” can be deposited in one place. It still has a long way to go, but at least now, I can use my cutting mat, ironing board and sewing machine.
I have been doing a little piecing each day, about an hour, which is plenty for me. My brain wants me to keep going, but the body just isn’t willing. I’ve been working on Bonnie K. Hunter’s Easy Street Mystery Quilt. If you are interested in doing this project, I recommend downloading all the instructions soon, and adjusting the grey fabric. She said several yards, and I think 1 yard would be sufficient, but maybe 1.5.
I have also been working on a string quilt for DD#2. She wanted, light blue, medium blue, and dark blue, with a hint of pink. I have all the light blue blocks done and a little more than half of the dark blue. On the left of the photo is the twosies to be made into 4patches for the Easy Street. And under the needle is a string block with foundation fabric.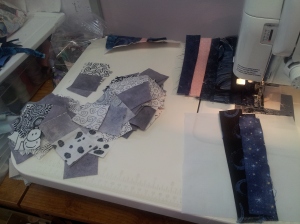
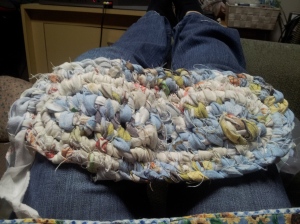
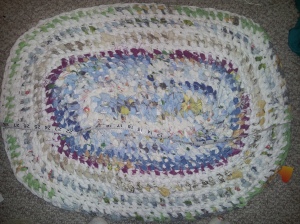
I have also delved into making rugs. From rags. The first one I made, is using the toothbrush method. It has several names. Instead of the modified toothbrush, or the tool, I used a large safety pin. Works great! The core fabric is white 100% cotton, salvaged from an old mattress cover (was in very good shape, except the zipper had come out of the stitching). I tore that up into 2″ strips. I need to back up a bit.
I have been wanting to make rugs for a while, and didn’t want to use my quilting cottons, so what to do. I searched on the internet for rag rugs, and found several methods using tshirts. So the hunt was on for tshirts. It takes about 40 tshirts to make a good size rug (24″ x 36″). Someone mentioned to me, try the local Hospital Auxiliary Economy Shop, they have a good deal on rag bags. So I checked it out, and got 35 lbs of rags. (2 bags). One was tshirts, the other was tea towels, and other bits of fabric (flannel). Jackpot! Bonanza!
I started making t-shirt yarn, bought 3 large size crochet hooks, and started crocheting. I didn’t really like the way it was turning out, so I stopped. I think if I had a pattern, which would tell me when and were to increase, it would have worked out better (need to dig out the crochet books), but I just didn’t like it much.
My next venture was the one using the linen tea towels and the 100% cotton as the core. I like this. No special tools (only the safety pin), and it was all half hitches, works for the sailor in me! So I sat one evening, and started working on it. The centre is very very very loose. I realized this much later, and didn’t want to tear it out and start over. So I proceeded. I started to alternate the 100% cotton for the linen, to give the rug a little colour character. Now the outer edges tend to be too tight, but I”m working on it. I found some more linen tea towels, and will be back working on this soon.
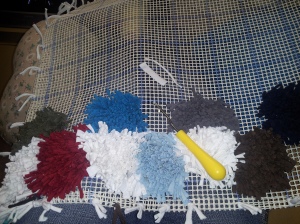
The third rug I wanted to make uses the rug canvas. I had the tshirts, cut up, into 1/2″ by 2 1/2″ pieces already to go. But I had no canvas. My DD#1 had made a couple trips out of town, and I asked her to check out Micheals, as well as a few other craft places. No luck. I guess I will have to wait for my out of town trips, two in February, and one in March. I was roaming Wal-Mart, looking for something (can’t remember what it was now), and thought I’d pop into the craft section. Sometimes inspiration will hit me there. Well, wouldn’t you know it… they have the canvas! Woohoo! OHOH, do I know where my latch hook is? Um, no. So into another section, and found a hook. I was ready to go.
Next problem… how was I going to do this. I decided cutting the 24″ x 60″ canvas in half to give me to rugs of 24″ x 30″. Good size, right? Do you know how much tshirt pieces… never mind. I am not going to figure that out until I am done! Well, I started by folding the raw edges over, and securing it with the tshirt yarn. Then I found out, (quick check on the internet for how to latch hook, it just didn’t seem right the way I was doing it, and it wasn’t), that I was using the wrong threads on the canvas. You want to use the double twisted threads, as it is stronger, and stops the rug from becoming misshapenned. Then I started. I thought I would just do a scrappy kind of look, but the size started to become intimidating. My DD#2 suggested I use white as the main colour, and use the coloured pieces in squares. What a great idea. After about 12-16 hours, this is where it is at. Oh, each square uses 100 pieces. It is taking longer to cut the tshirt material, then to make the rug!
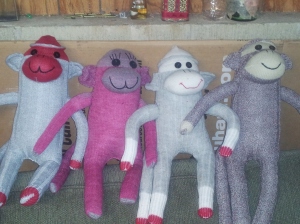
I have also been making more sock monkeys. The sock monkeys were the first project of 2013. It was time. EAsy enough to stitch on the sewing machine (now that I can get to it), and then sit and stuff, and hand stitch all the parts together. Working out great.
I would like to mention the trip in March. I have been asked to be a patient speaker at the Kidney Cancer Canada Annual Patient Conference. So, I have been dusting off my public speaking skills.
-Alice
- In: Crafts | quilting
- 6 Comments
I am both.
I must tell you a story, it is funny, 24 hours later, but it sure wasn’t when it happened. I decided to write a post. Lately, well not lately, as that would imply I have been blogging regularly, and we know that, that just isn’t true. I usually write it in MS Word on my computer, then cut and paste it, into a blog post.
Last night I did not do that. Now I’m getting a bit miffed, because last’s night post would have been so much more amusing than this one, but lets get back to the story, and then the blog post.
Anyway, I did not start writing in the wordprocessor. Instead, I started writing right here on the blog. No big deal, I would have thought, except, EXCEPT, I used the “Quickpost” feature, or whatever it is called. I had it all typed up, and was grinning from ear to ear. I had fun writing it. It was time to add the photos, so I clicked on the ADD PHOTO button, selected if from my computer, then clicked on PUBLISH. Worked great. Until I went to view it! It was only the picture. NO BLOG! And I’ll have you know, it was not a quick little blurb either. Then, in my wisdom, I backed up back to the beginning, of when I went into my blog, and isntead of going forward one page at a time, in the hopes my entry would have been in memory (this I have done before), I went into the posts area, to see if it had saved it in draft. Usually when I use the regular Add a Post window, it will systematically save my post as draft, until I am ready to publish it. This is where I went first. But it was not there. And then I realized I had lost my chance of trying to recover it by going forward.
It was getting late, and I was so angry..well not really, I was put out though. I gave the whole thing up.
Which brings us to now, tonight, and the purpose of the post. As we know, school started just over 3 weeks ago here in Canada. I had mentioned to DD#1 if she had a pencil case for DGD#1, and she said she didn’t know, and wanted to know why. So I told her, I could make her one. The weekend after school started, DD#1 texted me, asking if I had the pencil case done. Now did you read, anything that said she wanted me to make one. Nope, I didn’t think so. Anyway, I answered by saying, no, but I would do it that weekend. I proceeded to send her questions on what DGD#1 might like. The results:
Favourite colour – indigo and pink
Dragonflies. I have a Sizzix die cut machine, and have a couple of dies. The really great thing was, I had been at a garage sale earlier that day, and picked up an alphabet die, and a few others. I had the dragonfly already, but I thought it was neat, I had the alphabet, so I could do her name. Oh, that was the last question asked, name, name and last, or initials. Mom selected name, as she is the only one in the school with it. So away I went. I had a baby pink zipper, baby pink purchased bias binding, and pink and blue fabrics. My blue fabric was dark with black swirls through it, think of adding a coloured liquid heavier than water, into water, that is the kind of swirling.
Takes us to Sunday evening. I hadn’t been feeling over energetic, as I had worked the first week of school, and I was paying the price. If I overtax my energies, I can spend several days paying the price. Sunday evening, I was invited over to a fellow quilters home for tea, and the offer of some indigo fabric. We had tea with another quilter friend, and chitchatted about many things. The pencil case came up, and N. jumped up and showed me her drawer full of blue fabrics. There was a cloth on a bookcase, and I suggested, that was very close to indigo. She hunted in her drawer, and within seconds, found the perfect piece of fabric.
I had the pencil case for the following afternoon afterschool.
I love the next part of the story. *giggle* DD#1 brought DGD#1 to the house after school. DGD#1 knows Grandma is tired easily, so it was nothing to convince her to get my cell phone, which I had left on my ironing board in the quilt’n room.
She dutifully returned with my cell phone, with a peculiar look on her face. Almost a smile, but not quite, I think she was trying hard not to, but was excited.
I asked her, what was wrong.
She says, hardly containing herself, and just barely above a whisper. She is trying not to bounce up and down in front of me. “I saw something”.
What did you see, I asked her, with a dead pan straight face, knowing full well. You see, I had left my cell phone, purposely on the ironing board with her pencil case. Her Mom, held as straight a face as I did.
“Something with my name on it”, she almost squeals out, feet starting to jitter about. She is doing her best to contain her building excitement.
I said to her, “something with your name on it” questioningly, like she must be seeing things. Her Mom sees how excited she is growing, and tells her to go get it.
She returns triumphantly, and exclaims “It’s a PURSE. A PURSE for school!”. (I bet you are thinking, what a terrible grandma I am, for treating her like this. She’s a good kid, and she loves it when grandma makes her things).
Her Mom shakes her head, and I say, it is for school, but it is not a purse.
“What is it”, she breathes, almost hesitantly, because she is excited Grandma made her something, even though she isn’t quite sure what it is.
“ITS A PENCIL CASE”
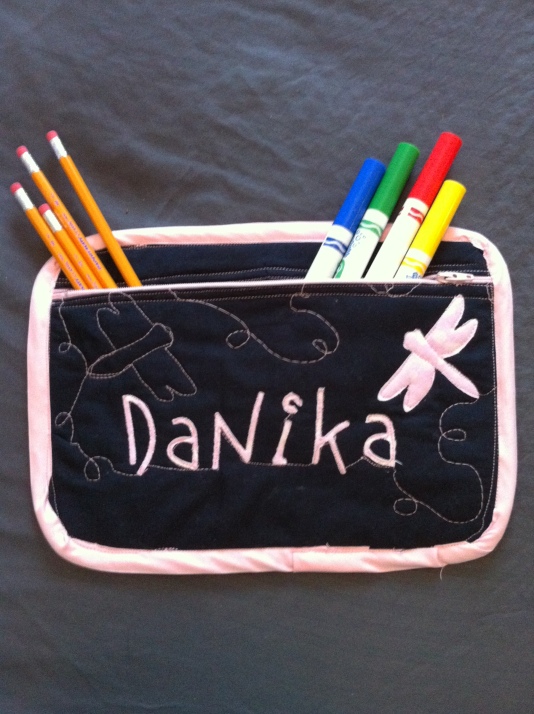
I had taken a photo with my camera, but it was blurry, so I asked DD#1 to take a photo for me. I loved this one, already for school I didn’t free hand the dragonflies very well for quilting, but I like it. The back has 2 appliqued dragon flies, and the trail, and a stitched dragonfly.

This is my DGD#1 prouldy displaying her pencil case, before heading to school with it.
I appliqued her name as well, using the Sizzix machine, and then machine stitched it on. I used fusible web, pressed it on the fabric, then ran the fabric and dies through the machine. Took off the paper backing, and laid it out on the case outer material, and pressed it in place. I then machine stitched in place, using a straight stitch. I then sandwiched the front and back, to give it a bit of thickness and protection, lined it, and quilted it. I cut the front piece in order to add the zipper, and I had not cut the batting to the full size, I trimmed it in order to allow the zipper. I had some trouble with the binding, and had to stitch it down twice.
The purchased binding was okay, but I was not happy with the results. I thought it would be quicker. The only thing quick about it, I didn’t have to cut a bias strip. And it is not doubled at the seam. The seam for the case is on the outside.
I have been working on the Scrappy 3d nine patch. Sewing the 9patch units together, cutting 400 of the light blue pieces, cutting out some of the white background pieces and about 40 of the dark blue pieces. I’ll leave the rest for another post.
FOOD FOR THOUGHT: What in quilting intimidates you? Have I ever told you that applique intimidates me? It seems, when I don’t think about it, I can do an okay job. But when I have to actually work out where pieces go, and the stitching, and the turning under, that scares me! If you are a blogger, and need a subject, I challenge you to tell us what intimidates you when it comes to quilting. Or just leave a comment below.
Looking to hear from you!
-Alice
3-D Nine Patch and a fresh look
Posted on: 4 July 2012
- In: quilting
- 7 Comments
Do you recall – hmm, seems I have been revisiting several past blog entries. *giggle*. I have been wanting to make a quilt using the 3-D NIne Patch blocks as mentioned in this blog entry. I’ve been working on it, as a leader/ender project, and have now more than enough 3 patch units to start making the 9-patch units.
I don’t know if many of you have organized your scraps… or do you even keep them? Well, I’ve been making a dent in the 1½” strips and bits I had… err, well, I though it was a dent, but I think they reproduce when we are not looking!
I decided that I was going to count the dark and light 3 patch units I have made thus far. Are you ready for this. Here are some statistics of this quilt.. even before I have started making the blocks!
- Size of block 8″
- Number of blocks in quilt 80 ( 8 x 10)
- Number of pieces per block 45
- Number of 9-patches required – 240
- Number of dark 3 patch units required – 480
- Number of light 3 patch units required – 240
- Size of each 9-patch unit – 3″
- Size of each 9 patch square – 1″
- Number of pieces for quilt before borders – 3600
- Number of unfinished light and dark 3 patch units – haven’t counted
- Nmber of 1½” strips and bits – too many – hmm… maybe a log-cabin quilt in the future
Sure is a lot of stats for a quilt that has only just begun taking shape! LOL. Oh, and before you ask… no I have not kept track of the hours, now wouldn’t that have been an interesting statistic!
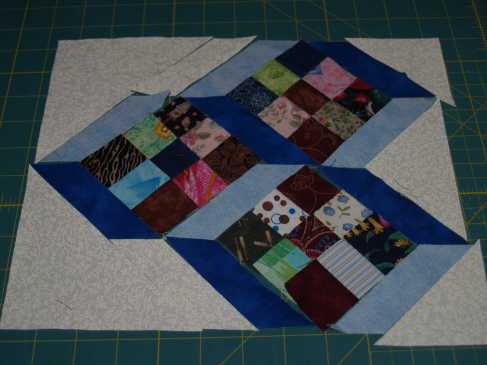
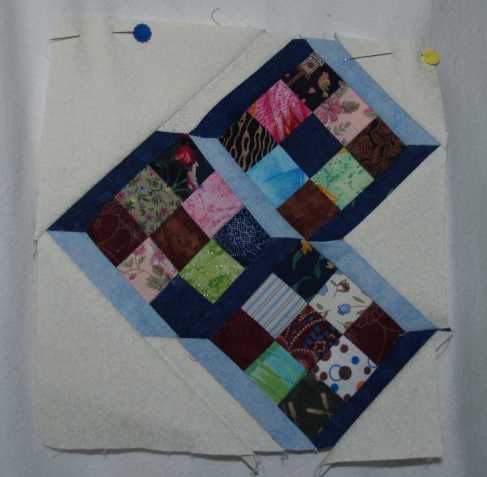
I had cut some fabric to make a mock-up of the block, to see how it would look, and possibly to figure out how to put it together. Okay, the putting it together part didn’t happen at that time. Here are a few ideas for the mock-up.
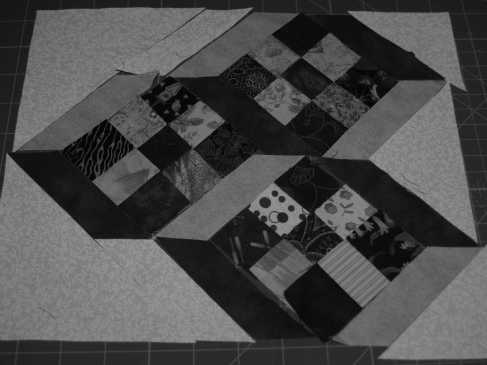
And just in case I included the black and white of the above photo:
After I had started piecing light and dark pieces together, the idea occurred to me, that going completely scrappy for each part of the 9patch may be a bit much, so I played with the idea of scrappy, but each block would have all the same dark patches, and all the same light patches. I did like it, but I liked the scrappiness better! Who knows, maybe a smaller more planned scrappy quilt may come later. – I don’t think so! LOL
When I was getting close, or at least my zipper plastic bags were getting somewhat fuller, I thought I would stitch up the mock-up, and figure out how to put the thing together. Little did I know how many set-in seams there were going to be!!! OH WAIT… another statistic
- Set-in seams per block – 12 (I think)
- Set-in seams for the quilt – 960!! (I must be crazy!)
Don’t look to closely, the small setting triangles are not put on properly. Something I am going to have to work out! The set-in seams for the mock-up are far from perfect, but I did figure out how to construct these blocks. I’m a bit aways before I will be constructing the whole block, but who knows, I may get tired after stitching several hundred 3patch units together, and I may get some blocks going after I have a pile of 9-patch units ready.
You know, I probably should take a break from all this piecing and get some quilts finished, or I’m going to be buried by quilt tops! To be honest, last week I decided I was going to take a quilt that has been sandwiched for 18 months, and quilt it today at my quilting group. Unfortunately, I wasn’t very well prepared, and I just grabbed the two totes for the 3D 9-patch quilt. Okay, I totally forgot about the quilting! That’s okay, because if I hadn’t taken the 3D 9-patch with me today, I wouldn’t have come up with all those statistcs. OH! I may have miscalculated or miscounted, and I’m okay with that. Maybe I should edit the above statistics to read “Approximate”! HA! I’ve just written it here, so if you have read this far, you found a surprise! *giggle*
-Alice
Food for thought – Have you changed or updated your blog recently or at any time? I’ve been wanting to, and well, today I did it. I’m not sure about the theme I have chosen, but it is good for now. I’m not too keen, that I cannot include a photo of some of my work in the background. My DD#2 suggested I should learn JAVA so I can write/design my own page. If I had the time, to sit down, I could figure it out. (I do have a computer programming background) Its just having the gumption to do so, and the time to do so. Tell me your thoughts on this new layout.
- In: quilting
- 6 Comments
Hello!
I have a request of all my APQ blogging buddies. Do you recall in 2007/2008 I was doing a block of the month – where I posted a block a weeek, and you were able to select one block, and after 6 months we were going to create a sampler quilt… then of course that fizzled and APQ shut down the blogs.
Well, I had thought I had “downloaded” and saved all my entires to the APQ Blog. But apparently I didn’t, or lost them, or something.
I am looking for the instuctions for the first six blocks:
Week #1 – Light and Shadows
Week #2 – Star and Pinwheel
Week #3 – Cats and Mice
Week #4 – Crossroads
Week #5 – Bear’s Paw
Week #6 – Leavenworth 9 Patch
Week #7 – Card Trick
I have the pics, but not the instructions I wrote up. If you have them, could you email them to me to southeasterly at hotmail dot com. Thanks.
After looking through these, I’m tempted to start up another block of the month thing. (or a block whenever challenge). I think I would also create them using the computer showing different colour ways and how different values will change the block. Many things to consider.
-Alice
Pillow Size Information page
Posted on: 25 June 2012
I have added a new page to my Quilting Information section.
I watched a demonstration of making a pillow case from a quilting group buddy, and am very much wanting to make some. We have several size pillows in our house, and I wanted a page where I could easily find the information. Soon, I hope to have a tutorial on making a pillow case.
-Alice
The Snowball Fight is almost over….
Posted on: 24 June 2012
- In: quilting
- 8 Comments
Just like a snowball rolling down a hill, this quilt got bigger and bigger.
You may reading the adventures of the snowball quilt. At that time, I was trying to decide on border options. As per usual, a different idea developed on its own.
With a snowball block, you end up with half square triangle bits left over. Instead of having to deal with these triangles, I decided at the time of making the snowball blocks to stitch to seam lines, and save the remaining pieces for something.
That something developed into an idea for a border. I have always wanted to do a pieced border, and this seemed as good an opportunity as any.
I have the top completely done. I stitched the HSTs into pairs, and then stitched the pairs into long strips. I had no idea how long I needed them, so I just stitched until it seemed right, and I had four borders ready.
For the two dark red borders, I cut strips 2′, and strip pieced them together. I had three different dark red fabrics, and randomly stitched the strips together. Some were 4, 5 or 6 strips wide. I then sub-cut these to 2″. And randomly grabbed from different piles and stiched them together. I continued stitching them until I had four borders. Oh oh… I forgot I wanted a second border, so more stitching went on.
I then measured the quilt and found my first border length. Cut, pinned, stiched, and did the same with the other borders. One thing I realized when I was partially through the first borders, that I would have cut them to fit differently. Of course when you are working with 1½” finished pieces, they do not adjust very well to the size of my quilt. (This is one of those ideas, that squaring up the blocks as you go, would have been a very good idea – one I didn’t follow). I trimmed the last unit of the strips to fit. Next time, I think I would like to measure from the center of each border, to the end, and cut off each end to fit the size I needed. This quilt was a learning experience! What better way to experiment, than with scraps!
In my mind, I think if I had measured from the center point, then all the seams for the three borders would have lined up. As it is, one half of each border lines up, the other half does not. But shhh… if no one looks really close, maybe they won’t notice. 🙂
It was a nice day outside, so I hung the quilt top on the line, and took a photo. The sun is kind of shining behind it, giving it some interesting shadows. The next step is to get this quilt, sandwiched, quilted and finished.
I don’t quite have enough energy to get that far, yet.
The fabrics for this quilt came from my stash, and my scraps. Some of the pieces, are from cotton shirts I purhcased at the local thrift store, and cut up. I wanted to make a quilt with a more masculine feel to it, and one way of doing that, was by buying the shirts! Insted of just using blues, browns, greens. Why are those colours more often used to represent male?
I am happy that this one is done. I think I started it three years ago (practically to the month!). I started making the snowballs as a leader/ender and then earlier this year, I thought enough was enough, it was time to get it finished.
-Alice
Food for thought: Have you ever “shopped” your stash to make a quilt? Do you have bits and pieces of fabric left over from projects, and they are odd shaped and sizes? Take 15-20 minutes and start cutting them into useable pieces. You don’t have to do it for long, and you’ll be surprised how quickly those messy scraps can be made. You can even make a “free” quilt by using up your scraps. Don’t put a time frame on it. Just take a light and a dark piece, stitch them together, each time you are working on a quilt, at the begining and end of each strip you piece. Once they are stitched, press, and place in a bin. Before long you will have enough pieces for a 4-patch, 9-patch or any other block you desire. For more great scrap busting ideas, be sure to check out Bonnie K. Hunter’s blog and website.
- In: quilting
- 10 Comments
It started about two years ago, a challenge among quilting friends (sadly, I don’t even recall what the challenge was). It was also a good opportunity to try the leaders and enders that Bonnie K. Hunter recommends. If you haven’t heard about leaders and enders, I recommend you read Bonnie’s blog on the subject.
I decided for the challenge I wanted to make a scrappy masculine feeling snowball quilt. I had lots of 3″ squares, I could use. I then started scrounging for 7″ squares. Cut down some of the 10″ squares to get a 7″ and a few 3″. So as I worked on other projects, I would stitch one of the 3″ squares to the 7″, and away I went.
At some point, I figured I’d better count how many completed blocks I had, and how many more of each (needed alternating dark and light blocks), I needed to complete. I wanted to get this quilt done, so it became a non-leader/ender project.
A few weeks ago, I was in a position to start stitching the blocks together. I think it was an Eleanor Burn’s video I saw that described how to piece the blocks together by columns, instead of stitching each row together. This method you do not trim the blocks apart. As you stitch all the columns together, the rows are “attached”, and you just pin and stitch them together. I found it worked very well. I had to unstitch some of the chain stitching, as my first 2 rows got twisted somehow. Was easier to snip the chain stitching, instead of trying to untangle them. Stitching the blocks together in this fashion works very quickly.
As I was finishing up the blocks, I started to realize I did not have a plan for the borders. I wanted to carry on with the scrappy theme, and use from my stash. I don’t have enough yardage of any one fabric. But an idea started to form. When I was stitching the blocks I added another line of stitching 1/2″ (approximately), from the required stitching line, then trimmed the Half SquareTriangles, to create them. I was sure I would use them somewhere, sometime down the road. I can use the “leftovers”.
The last couple of days, I’ve been trimming and pressing all those leftover pieces. The smallest piece was about 2″, and the largest about 2 1/2″. I decided to trim down to 2″.
Now that I have done that, I have not measured the top as it is now. To be honest, I didn’t even square up the blocks, and I realize now I probably should have, but it is a scrappy quilt, and I’m not overly concerned if the seams match up or not. The concern is the actual size of the top as it is now, and if it is “square”. I think I may have a couple of wobbles in it. Ah well, it is going to be a utility quilt, I think. Something I can practice my Free-motion quilting with.
I decided I wanted to do a “floating” type border. Now that I decided I was going to use those leftover pieces, I thought it would be neat to float them. To me this means having the same colour of fabric pieced around the scrappy blocks, to make them as if they are floating on the border fabric. Opened the stash cupboard to see what I had that would be appropriate. Again thinking scrappy. I didn’t have enough of anything really to work. I did have some fabric, three pieces of that were all the same shade. I took them out, pressed and trimmed to 2″. I then happily sat down at my sewing machine, and proceeded to stitch the HSTs to the strips of fabric. I cross-cut, and came up with another idea.
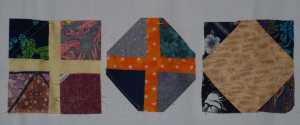
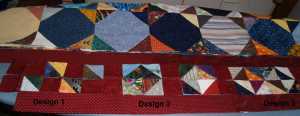
Design 1 on the left, Design 2 on the right
I wasn’t so sure now about the floating squares. I had only really seen them on black fabric, and typically bright fabric was used.
Then I thought about stitching four of the stitched squares to each other, putting all the lights in the center for one unit, and darks in the center for the other, with a spacer of the border fabric between each unit. This pattern copies the patterns of the blocks. I had every intention of following that idea.
Design 2 on the left, design 3 on the right.
Then another idea hit me (Design 3). What if I was to create the same design of the small triangles from the snow ball blocks. Alternate the dark and light to create the same design, and then drop the spacers completely. I could then mix up the border fabric to make is scrappy. Granted, cutting them into 2″ squares is going to make a lot of work, but I think it will continue with the scrappy theme of the quilt.
Deisgn 1, Design 2 and Design 3.
So this is where I’m at. The more I look at Design 3, the more I like it. I think it is also called “Broken Dishes” block. I will use the dark red strips for the inner and outer border, maybe I will piece 4 of the triangle units together (4 patch), and then when I have a pile of them, stitch to the border strip (width of fabric), and then crosscut. The border pieces will then be 3 1/2″ long, or 3″ long when finished. That way, I don’t have to cut 2″ squares, and try to get them aligned nicely.
I may have to throw in some “spacers” to get the borders to fit the top. Or, maybe I will just trim the blocks to make it fit. If they don’t line up, I’m okay with that too!’
So what do you think? Would you have stuck with your first idea, or would you have let the creative juices flow, until something else came up.
-Alice
PS – I bet you didn’t expect a second post from me so quickly! Me neither, but I wanted to share. I have been feeling really good the last few days. I can only work an hour or two at a time, but it feels good. So I stitch, press, trim for a bit, then when I start to feel “it”, I go and rest for a few hours. Then I’m back at it. This process is doing me good. Although the brain is still doing the “GO GO GO”, at least now I’m listening to the body and when it starts going “NO NO NO”, I’m stopping!
Thank you all for your comments. Your support has definitely raised my spirits up!
More footprints – Memories of Maui
Posted on: 26 March 2012
- In: quilting
- 7 Comments
So here I am! Not much news on the quilting front, actually not much news on any front!
Thank you to Ruth, for giving me the much-needed boost to write. I promised a little while ago, that I would share what I did with the label for the “Memories of Maui” quilt. The photos have been sitting on the disc in the camera for, well lets just say, long enough!
Do you recall when I first started this quilt? My first blog and photos of the “Hawaiian Quilt“. I did a “close-up” (although I must admit, revisiting it, it is not much of a close-up). I mentioned, I think, of having a bit of fun, and including some of the backing fabric into the blocks. It made a meandering path of footprints from the bottom of the quilt to the top, on the left side of the quilt. It was very clever of Shawn to include in the quilting footprints travelling up the quilt as well.
When I was delivering the quilt to Marie, she sent it back home with, and asked if I would do the label. The plan was just using a piece of muslin, writing out the particulars, then stitching a border around the muslin using the fabric that was used for the binding, and the inner border. That was the plan!
As I drove home a completely different idea took place. I couldn’t get it out of my head. I drew it out on paper. Erased. Redrew. Erased again. Redrew. I did this a few times, until the design was just right! Then I realized, I was going to have to figure out some way of transferring the idea from paper, to fabric! What was I thinking! My drawing skills are not the best, and I had to think about it for quite some time, on how I was going to take the design from paper and transfer the idea to fabric. LOL. I should have taken some photos of the drawings.
I have not done much machine applique, and again it was one of those things, I just jumped into without giving it too much forethought! Its amazing what you can achieve, when you don’t think about it too much, and do not let your intimidation take hold. I decided I wanted to use the satin stitch for the applique. Of course, that made it so much easier! I’ve used the satin stitch on other things, besides applique, so it was “easy”. Did I mention that I don’t think applique is easy? I know it needs more practice. I just haven’t found much I wanted to do, to achieve the practice.
Oh, I had considered using my embroidery machine, but again, I haven’t had much practice with it either, and I wanted to use the KIS principle. Keep It Simple
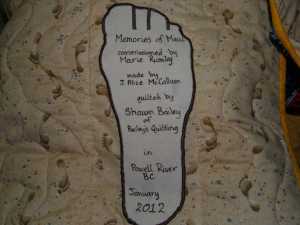
Here is the label! I was so surprised, when I realized the fabric lined-up with the backing. I turned it over and used the ladder stitch to stitch the label to the backing.
I traced my foot. Have you ever noticed that tracing a foot, looks a lot different then a footprint? I really didn’t like the shape, so I cleaned it up a bit. I cut out the muslin foot print, and pressed a piece of freezer paper, so I could do the writing. I had darkened the lines on some lined paper, and transferred those to the “dull” side of the freezer paper as a guide when I wrote the label information. I cut a piece of Pellon Wonder Under and traced the foot outline, and applied it to the muslin. I cut out the foot shape. I then appliqued the foot shape to the fabric using the satin stitch. I had decided to use the backing fabric to ‘hide and blend’ the label to the backing.
I have to mention this again, but I was so surprised that I could line up the label with the backing fabric to “hide and blend” the label even more. I was very pleased with the results.
Marie was so tickled. I had told her I kind of lost the little toe, and that someone had suggested I create a toe ring. She said she would have loved that! Oh well, if I had asked her, it wouldn’t have been a surprise. I really enjoy making labels that are not “square”. I like the whimsiness of using different shapes.
And I haven’t done this for a while! Here is my challenge to you, if you choose to accept it! If you have not made a unique shaped label, I challenge you to do so on a quilt.
Now for a personal update: I am doing okay. My 6 month scans were all clear. It seems that I have chronic pain. I have found that this has been very draining, but I am now taking medication so I can function. I didn’t realize how debilitating pain could be. I have been off work since the middle of December. I just found it had become too much, and I wasn’t doing anything but working, even at only 3 days a week for 4 hours a day, I was resting when I wasn’t working. I realized this is not what I wanted to do. I needed more than just working in my life. I think what brought it all to a head, was when my DD#2 really wanted to do some craft things with me for Christmas, and I just didn’t have the energy to do it. The look of disappointment on her face broke my heart. She understood, but I didn’t. I am now working up to doing things I like. I meet once a week with a quilting/sewing group. That exhausts me too, but at least I am having fun!
I had my one year anniversary of my diagnosis. I survived the week. As a year ago, it was a week-long experience. I wasn’t sure how I was going to react. It wasn’t as bad as I thought, but I think I prepared myself to look on the bright things. At the Living With Cancer Support group they told me to celebrate and I did. I made up for missing my birthday last year. I hadn’t really thought of it at the time, but yes, I was diagnosed two days before my birthday. I celebrated with 21 family and friends with a pot-luck dinner. A friend (who has the same birthday as me) of my father’s had stopped by and asked what they could bring. I had invited him and his wife to join us. He plays in a band (bluegrass and country music), and asked if I would like them to play at the birthday party. I was honoured, and told him I would love that. The music was fabulous. One of my friends from out-of-town gave me a book “Choosing to Smile” written by three British Columbian women about their lives with cancer. The book was inspirational. I didn’t know if I really wanted to read someone’s story about cancer, but I am glad I did. I laughed, and I cried. I hadn’t realized it, but for my journey, I have also chosen to smile. And I will keep smiling. Recovery is taking longer than I expected, but I am at this point in time, cancer free. I am so thankful and grateful for all of you! My “Hug Quilt” is on my bed, and every night I goto sleep with it tucked around me.
I have put together a project which I will be working on at my sewing group. I just realized, I started this project two years ago. It was a Leader/Ender project, and now it is coming together. I am hoping to have all the blocks stitched together this week, which means another photo-op, and another blog post!
-Alice
Memories of Maui
Posted on: 7 February 2012
- In: quilting
- 9 Comments
That is the name of the “Hawaiian Quilt” I’ve been working on for over a year. I should clarify… I didn’t have it for the entire year, it spent about 4 months at the quilters. You may remember the beginning of it from this post.
I delivered it to the woman who commissioned me to make it, last Tuesday, Januarey 31. She was thrilled.
The first thing I told her was that she and I were to be married to the quilt because this quilt has been through “sickness and health, and richer and poorer” or maybe I should marry it.
I haven’t measured it, but I guesstimated about 400 inches of binding I stitched down by hand. Almost 3/4 done, when the thread started shredding. I was so frustrated with it, but wanted to get it done. She was supposed to be on her way back to Hawaii in mid-January. I had been using Piecemakers Betweens. The only thing that was different, I started wearing a thimble on my middle finger, as the eye kept poking into my finger, and it was getting rather sore. After changing thread and the needle. I changed the needle once more to one with a little larger eye and about 1/4″ longer. The other thing… I dropped my thimble in the couch. But I got it done.
I used the ladder stitch, you may remember that I really liked using Sharon Schamber’s binding technique. Way back then… yes, I looked it up, just over three years ago there wasn’t much on the “ladder stitch”. Wow, time flies. Anyway, when I was trying to explain to my mom through messaging on the computer and then by phone, I did a quick search, and couldn’t believe all the hits.

Marie and her quilt “Memories of Maui”
My friend Shawn (MsLibra) did the quilting on this quilt. She used a topography design, with foot prints walking up the quilt.
I’ve been asked to make the label for her, and I was hoping to do that on February 8, at my sewing/quilting group, but forgot the hall has been scheduled for another event. I should work on it from home. I have some ideas on what I’m going to do, but can’t say anything until its done. The label will be another blog entry.
I do regret I didn’t take photos of all the different shapes of the fabric when I received it. Approximately half of my time was spent cutting the rectangles.
I’ve been through a lot with this quilt. It has waited patiently as I went through my health issues. I am very glad it is completed and soon will go to its forever home, but I will miss it.
Next step is the label.
-Alice
