Posts Tagged ‘quilting’
Memories of Maui
Posted on: 7 February 2012
- In: quilting
- 9 Comments
That is the name of the “Hawaiian Quilt” I’ve been working on for over a year. I should clarify… I didn’t have it for the entire year, it spent about 4 months at the quilters. You may remember the beginning of it from this post.
I delivered it to the woman who commissioned me to make it, last Tuesday, Januarey 31. She was thrilled.
The first thing I told her was that she and I were to be married to the quilt because this quilt has been through “sickness and health, and richer and poorer” or maybe I should marry it.
I haven’t measured it, but I guesstimated about 400 inches of binding I stitched down by hand. Almost 3/4 done, when the thread started shredding. I was so frustrated with it, but wanted to get it done. She was supposed to be on her way back to Hawaii in mid-January. I had been using Piecemakers Betweens. The only thing that was different, I started wearing a thimble on my middle finger, as the eye kept poking into my finger, and it was getting rather sore. After changing thread and the needle. I changed the needle once more to one with a little larger eye and about 1/4″ longer. The other thing… I dropped my thimble in the couch. But I got it done.
I used the ladder stitch, you may remember that I really liked using Sharon Schamber’s binding technique. Way back then… yes, I looked it up, just over three years ago there wasn’t much on the “ladder stitch”. Wow, time flies. Anyway, when I was trying to explain to my mom through messaging on the computer and then by phone, I did a quick search, and couldn’t believe all the hits.

Marie and her quilt “Memories of Maui”
My friend Shawn (MsLibra) did the quilting on this quilt. She used a topography design, with foot prints walking up the quilt.
I’ve been asked to make the label for her, and I was hoping to do that on February 8, at my sewing/quilting group, but forgot the hall has been scheduled for another event. I should work on it from home. I have some ideas on what I’m going to do, but can’t say anything until its done. The label will be another blog entry.
I do regret I didn’t take photos of all the different shapes of the fabric when I received it. Approximately half of my time was spent cutting the rectangles.
I’ve been through a lot with this quilt. It has waited patiently as I went through my health issues. I am very glad it is completed and soon will go to its forever home, but I will miss it.
Next step is the label.
-Alice
A scrap busting want to do…
Posted on: 10 January 2012
- In: quilting
- 18 Comments
It seems there are so many who plan to bust their scraps this year. I too have had some really neat ideas popping through my head. Reading Ann’s blog post inspired me to post.
The one block/quilt I would like to try is from Bonnie K. Hunter.
Bonnie K. Hunter’s Winston Ways block
It is called Winston Ways. I have tons of HSTs leftover bits, and I think this block would be perfect to use them up.
Last fall I was invited to a sewing group, and with my low energy levels, I didn’t participate in the sewing/quilting days. Although I would stop in from time to time for a coffee visit. Although my energy levels are still quite low, I am taking small projects that I can work on… it takes me a lot longer to do simpler tasks, but I’m okay with that. I’m getting out of the house, and I enjoy their companionship. I do more visiting than anything else.
I saw a General Surgeon yesterday (he removed my gall bladder), as I was still experiencing some low-degree pain. There seems to be a problem with one or two of my lower ribs. They are sore, possibly due to an injury. He’s ordering a CT-Scan to determine if anything turns up. My daughter told me I shouldn’t be lifting anything, which she may be right, so as a good Mommy, I will listen to her, which means I won’t be lifting my sewing machine, and wont’ be doing anything with it. I am really hoping that knowing about the ribs, will help give a jump start to the progress of my recovery.
Thank you all for your comments of encouragement and well wishes. I truly appreciate it.
-Alice
- In: quilting
- 12 Comments
You may have seen Sandy’s Bindbara, a few weeks back. It was so neat to see someone I “knew” also making this.
My friend MsLibra had me out for coffee and a visit, and she told me about this website called PaperPanache, and she proceeded to tell me about the Fairy Quilt Godmother mystery block that Linda was doing. After we were back at MsLibra’s, she sat down in front of her computer and asked me for my email address. (She does have it, but much faster to ask me directly). The next I knew, I was being signed up for my very own Fairy Quilt Godmother. After answering, or rather choosing one word each from ten categories, my Fairy Quilt Godmother mystery block was on its way to me, via email. Not only do you get the block, but you get a special name for your FQG too! This is the story of how Needlella came to be my Fairy Quilt Godmother.
It was the perfect project to bring me back into quilting, without it being over strenuous or time-consuming. The toughest part I found with it, is selecting the fabrics. It was great that Linda had included some tips for creating your very own Fairy Quilt Godmother.
After my fabric choices, it was time to cut out the sections for each part. There were six parts, and each part had anywhere from twelve to thirty-two pieces, for a total of 121 pieces. I started from Part A, and worked my way “down” to Part F. As it was, Part A, is the top of my FQG’s head.
And this is what she looked like before quilting, and embellishing.

One of the suggestions was the wilder the hair the better! I used one of my pieces of sewing/quilting themed prints for the background. Doesn’t she look pretty good. I wanted eyes that had a bit of sparkle, and something a little different. I had some purple with actual sparkles in it. I think it worked out great. And of course, what would a bit of purple be without some lime green, which became her eyeshadow.
Now for the quilting. For the background and parts of her skin, I did a micro-stippling. I used two layers of high loft poly batting, so I could create some definition to her face. A somewhat 3-D effect. I called it Sculpting. I found I kept touching my own face, to see how I could make a 2-D image into more of a 3-D image. It was fun.
Then of course, I started thinking of embellishment. What if I was to do “this”, and add “that”. I had been thinking of some way of adding a magic wand, but didn’t have the energy to proceed with it. Who knows, down the road she may graduate from training, and get a full-sized wand!
And here is Needlella completed and waiting to be hung in my Quilt’n Room.

Doesn’t she look all dolled up. I wanted to add some lace trim around the bodice of her dress, and had this beaded piece. I realized as I was hand-stitching it, that it may have been better, if I had thought of it prior to stitching the sections together, but I didn’t know I was going to be doing any embellishment. For her necklace, I had another piece I could use. I snipped it where it meets the Q, and hand stitched it down. It has crystals in the centre, to give Needlella a bit of bling. I had considered to give the Q pendant some dimension, but I didn’t have anything that would work, so it is just a pieced pendant. I added some star beads into her hair, and gave her a pair of Needle earrings. The needles I was given some time ago, and they are rather poor quality, in fact, although being brand new, one had a defective eye. A few creative stitches, and I was able to place them where I thought her ear lobes would be.
This little project still requires a sleeve and a label, but it won’t be long before she finds a spot to hang in my quilting room. And if I can find the can of silver spray paint, I’ll be considering making her a wand.
-Alice
- In: quilting
- 8 Comments
No, not really.
But I did have to share this Give-away with you, and besides, some of you may want to get in contact with her again.
Intrigued yet?
Her blog give away is about a new product that she is now offering at her store. For quilters, I think this may a breakthrough we’ve been looking for?
Do you have problems with thread fraying or breaking at your needle on your sewing machine? If you have answered yes, or if you are just a bit curious, please check out my friend’s blog post.
Granted, now that I’m telling you all about the give-away, it lessens my chances of winning, but I hope that you give this product a try, and support my friend in the process.
Okay, okay… I can hear you now… “GIVE US THE BLOG LINK”.
Without further ado, here is MsLibra’s blog, now you’ll have to go to her post to find out what this new product is! You may remember MsLibra haunting the APQ blog. Be sure to tell her you followed the link from my blog. No, I don’t get any extra credit, I thought it would be fun just to track all of us!
-Alice
- In: quilting
- 8 Comments
On Quilting Friends an online community, one of the members issued a challenge – now the details are a little fuzzy, but basically to list 10 UFO items, and complete them before starting any other projects.
It has been several months since I’ve updated my list… and a few projects have come and gone, so were never added. So I’m working on a few now. Some were from classes/demonstrations from my quilt guild. And some are just ones I’m doing.
Some of the items on the list are not really UFO’s, but WIPs, but they do need to be done too.
Current List of 10 UFO items
- My very first quilt (when I was 9 years old): fix, size, sandwich, quilt, bind, label, post pic
- Curve Play quilt: piece 24 blocks completed, sandwich, quilt, bind, label, post pic
- Bear’s Paw quilt (Oldest DD): 6/6 blocks completed, borders, sandwich, quilt, bind, label, post pic
- Intertwined Squares: pieced, sandwich, quilt, bind, label, post pic
- Beading Experiment: piece, sandwich, bead, quilted, bind, label, post pic
- Flight (Bargello #2): piece, sandwich, quilt, bind, label, post pic
- Fast Scrappy Quilt: piece, quilt, bind, label, post pic
- Christmas Attic Window: piece, sandwich, quilt, bind, label, post pic
- Strip-quilt – blocks, border, sandwich, quilt, bind, label, post pic
- Scrappy Snow-ball quilt: blocks, border, sandwich, quilt, bind, label, post pic
COMPLETED QUILTS removed from the “10 UFO Items” List
- 25th Anniversary Quilt – Entwining Love COMPLETED August 2009
- Flutterbys: COMPLETED February 2009
- Landscape Quilt – Winter Sunrise over Bayne’s Sound: COMPLETED! February 2009
- Mystery Quilt Star Bright: COMPLETED! 12 February 2008
- There’s a Dog on My Quilt: COMPLETED – 21 February 2008
- Stained Glass Rose Wallhanging – Rose, where did you get that red: COMPLETED! 12 March 2008
- Mom’s Red-work Cat Quilt – Gotta Love Cats: COMPLETED – 05 Sept 2008
- Sunflower placemats: COMPLETED – 20 August 2008
- Community Charity Quilt: COMPLETED!
Looking at the list this way, it breaks down the project, and makes the goals of completion seem more achievable. I’m looking over the list, and realize that they are achievable… except, that how I envision them being quilted, and my current quilting level of experience don’t quite match. I think I will have to work on that this year.
GOAL FOR 2010 – Practice quilting techniques, and find motifs that are of interest!
Have you updated your List of 10 lately? And what is your goal for 2010?
- In: quilting
- 4 Comments
To see time fly… and boy, has time just flown by. I can’t believe it’s been almost a month since I have written in my blog.
The binding class went very well. I received several phone calls, emails and a few personal discussions on how well the participants enjoyed the class. They have suggested that it be done next time on a Saturday, instead of an evening… just a little more time. I thoroughly enjoyed it, and am glad they did too.
Life has been a roller-coaster… when is it not, eh? But I think I am on a bit of a smooth patch right now.
I’ve been busy making “microwave potato bags”, and they are the bees knees. I was sceptical at first, you know… items cooked in the microwave are just not quite the same as the oven or stove. Well, I can tell you, I am no longer a sceptic. Okay, yes, they are not quite “my” perfect potato, but they do look and feel as if they have just come out of the oven. (I like mine a bit over done so the peel is nice and crispy… mmm, smothered in gravy… mmm… okay, back on track).

The first four potato bags - 3 small, and 1 large.
My potato bags are made with 100% cotton fabric, batting and thread. The velcro closure is not a problem in the microwave. They are machine quilted, I thought it added a nice touch, and the binding is bias binding. I had considered using the pre-made stuff you can buy, but it is 55% polyester, and I didn’t want to take a chance with that in the microwave. Polyester is probably better than nylon, but… why take the chance right?

Potato already to be cooked.
I have seen several microwave potato bags in different venues on the internet, and most of them say “cook potato as per manufacturer’s instructions”. Well, what if you are like me, and you don’t know where your microwave instruction manual/booklet is? Or… what if you have a different wattage microwave? Did you know the “standard” microwave oven is 700 watts? Good grief, mine is 1200 watts! How long will a potato cook in mine? Well, I was fortunate, I have a preset program, so i tested my bag with that. OH what a wonderful potato. Ummm… the next bag of potatoes we bought… were huge… they are probably the size of 3 fists… where a typical potato is 1 fist. Now, how am I going to figure out how long to cook them.
To answer some of those questions, I did a little sleuthing on the internet. If you look, you can find just about anything on the internet, and I did. I found a website that offers conversions, for example 700 watt to 1200 watts cooking times. The site has microwave cooking tips, and much more. I’ll be honest, I didn’t really go much past the Conversion page.
I have found that working on the microwave potato bags has rejuvenated me… or perhaps it was something small I could do while in the roller coaster of life, and now that things are a bit normal, I can work on the “bigger” projects. Well, whatever it is, I have gotten back to work on a few projects. I am embellishing my first Bargello – West Coast Sunset, and I’ve been working on the second, which is for DD#1… I haven’t named it yet, will have to get it all pieced together, and see what it looks like.
And my butterfly quilt is calling me, to have some more quilting done on it too.
I hope that all your quilting needs are fulfilled, and I suggest you stop, and pick up a small project, if you are feeling a little overwhelmed with life, or larger projects, it may be the little boost you need.
-Alice
- In: quilting
- 7 Comments
That just rolled off the tongue, but I don’t know how accurate it will be.
As many of you know, my life for the last three weeks, has not necessarily been my own. A little more than two weeks was spent working from 5:00pm to 3:30am. I adapted to those hours quite nicely. Our last week or the third week, the second through fifth night was from 1:30pm to 12:00 midnight. Wasn’t too bad, except I was still up until about 4:00 or 5:00am. The very last shift was on Saturday, October 11, from 10:00am to 7:00pm. It was difficult getting up at 8:30am, as I didn’t get to sleep until almost 5:00am. It was very strange however, driving to work in the morning, and seeing the morning light, and cars.
I am having difficulty adjusting to “normal” hours however. Saturday night, I slept for 12 hours, and I lost Sunday morning. I must have needed the sleep.
Last Sunday, which was my day off, I paper-pieced an origami crane. I wanted something that I could work on, that was not too quick, and something a little different.

I wasn’t to sure on a few of the fabric choices, but its growing on me. I think I would have liked a little more contrast on the neck and tail portions.
I am thinking of making two more this size… hard to believe it is only 4″ (sort of square). I am thinking of perhaps doubling the pattern, and placing all four in a setting. Perhaps even reversing one of the cranes so it is looking at the large one… or (as this thought occurs to me), having the large one, lower right hand corner, and the smaller ones “following” it… like a momma with her babes. I’ll have to get the blocks done to figure out what I’ll do with them.
I had considered trying to get them done for my binding class which I am doing on Thursday, but I have spent too much time sleeping yesterday and today.
Which brings us to the next topic. I am demonstrating Sharon Schamber’s Binding Technique to our guild on Thursday. I have been using this technique for a little while now, and I do enjoy using it, instead of using pins or clips. You can visit Sharon’s website and watch the 90 minute video, or you can check out my video listings, and watch the video in 3 portions of approximately 30 minutes each. I don’t have the perfect corners yet, but with each binding I do, it gets better. I have even discovered a few additional tricks of my own to add to this technique. I have since changed my mind on what I’ll be using for the sample. As I was writing a message to an online quilting friend on one of the Quilting Communities
Now for something completely different. Last Wednesday (October 8), I was heading home, and I noticed on the other side of the road a bird… a seagull or something I thought. I turned around, and pulled up about 10′ away from the bird. I noticed it was a duck. For those of you who don’t know… most birds, such as chickens and ducks become “stupid” when it is night time. It’s not that they are really stupid, they do not have very good night vision (practically none at all), and are fairly easy to snatch up. Bears know this, and they liked to raid chicken hutches at dark. We have chickens, so I know from experience… but back to the Duck. I grabbed my cell phone to call 911, but it was dead, and even plugging it in to the van, didn’t give me enough to make a call. I got out of my van, and checked the bird out. I noticed it was a relatively young duck, and probably a Muscovy (this is not the specific duck I rescued). He was not too worried about me being near him. He was standing on one leg about 6″ from the edge of the road. Although there is not very much traffic on this road at midnight, there were a few vehicles, so I walked him a little off the road. During this, I noticed one eye was injured and slightly bulging, and he had an abrasion on one “elbow” of his legs. I didn’t want to leave him for the wildlife (bear, cougar, raccoons), so I took off my jacket and after a few attempts, I had him. It was a good thing I was only about 500 metres (yards) away from home. I found a box and placed him in it. He was very curious as I put him in the box, and none to happy, that I was shutting him up in it. When I called the SPCA the next morning, they asked me to take him to the vet, which I did. The vet’s office called on Friday, to let me know the duck was doing fine, and they were wanting to know the location I found him. Apparently there are a few people around there that have ducks. I think he made it home safely.
Today is our Thanksgiving Day! I was really hoping for a Turkey, but DH decided to have a ham. We’ll have all the kids and granddaughter her for dinner. It will be nice to visit with all of them, as I really haven’t seen much of them over the last three weeks.
Now, all I need to do, is get my life back to some sort of normalcy (whatever that is), and sort out my projects, as well as home stuff.
On one of the quilting groups I belong to someone posted this link – http://woodgears.ca/eyeball/ I don’t have a “Fun Friday” post or anything like that… as of yet *wink*, but I thought this was neat to share with you. My first time through, I didn’t understand some of what they were looking for, but I figured it out. Try it once and then post your score. My first was 5.5, the second 4.4.
I hope your week fulfils your quilting needs, and remember, you’ll only have to time to quilt if you make the time… you’ll never find the time!
-Alice
Gotta Love Cats – completed!
Posted on: 6 September 2008
- In: quilting
- 6 Comments
I am very proud to announce the completion of the quilt for my Mom. I have named it “Gotta Love Cats”. My mom is a fanatic cat lover!

There is a little story behind this quilt. In April 2006, I attended my first Guild Demo night – Redwork. I was a little anxious at first, because I didn’t know very much, actually very little about quilting, and didn’t think I would ever use this technique… well, at least not in the near future at that time. But I thought, it is a new skill, and even if I never use it, or don’t use it for several years, I’ll know how to do it. It was a fun evening.
Or so I thought! HAH!
I believe as I was driving home that evening, an idea struck me for a quilt for my Mom. I would make her a quilt with cats, and do the cats in redwork. But what would I use for an alternating block. I had read about those, although didn’t really know much about them either. I looked on the internet, and found a block that would be appropriate… “Puss in the Corner”. I started buying 1/2 yard pieces of red fabrics. My Mom likes the colour red… this worked out well, I think, as it is Redwork.
Where do I find “Cats”. Okay, one of the suggestions from the demo night was colouring books. So after a hunt high and low, I found a few old colouring books. My kids are pretty much out of that stage. And try and find “traditional” colouring books… oh no… they are all “themed” – Spiderman, Barbie, Dora, etc etc etc. Then I thought, I would check the internet. Found quite a few there too. In order to trace some of them, I had to “remove” the colour from the image… which I did using MS Paint. I’m thinking now, I would have been smarter just to print them, and go over the areas I wanted to trace/stitch with a heavier marker. Ah well… it’s all a learning experience. It took me two years to complete this quilt. I am pleased with the way it turned out.
Each Puss-in-the-corner block is quilted differently. I was “learning” how to machine quilt, and wanted to work on free motion. A few blocks have “kitty” type words in them – Meow, and such. As well as the names written in free motion, of my Mom’s current cats – Bugsy, Opie, Smoky. And there are hearts galore over the quilt.
 This block is the first one I quilted… I drew a design then used Press-n-Seal to “mark” the quilt. I wrote about my adventures with this technique/tool in this blog – Glad Press’n’seal – the new quilting tool.
I had purchased a couple of Patsy Thompson’s quilting DVDs, and had watched them, trying to decide how to quilt this quilt. The blocks were “easy” enough, I suppose, but the borders intimidated me. I haven’t marked a quilt, especially a big one, to be quilted, the thought scares me. I know… eventually I’ll get over it. With a little inspiration, well, actually a lot of inspiration from Patsy’s DVD’s I just went for it on the borders. I combined a “lazy” vine, with some hearts, instead of doing a feather motif. I used a variegated cream to brown thread. I had a lot of fun doing this. In the corner 4-patch blocks I did a double square on point.
 See… more cats in the border too!
Then there’s the label. Usually I find the label the hardest thing to do for a quilt. In fact, I had this label done before I finished the quilting. I had an extra block left over, and I decided to Machine Stitch the information on a piece of muslin, and use the decorative heart stitch to attach it to the extra block.
 Check it out… kitties on the backing too! I had been told that when making a “Cat” quilt, one must also always include a mouse. While trying to figure out, how I was going to quilt it, I played with the idea of mice chasing each other around the border, but, the marking of it all, intimidated me. So, I red-worked the cat and mouse on the label.
Although the quilt is 3 months past my deadline, I am very happy how it turned out. (I have mentioned that). Now to get it packaged up, and shipped to my Mom. Do you think she’d mind if I kept it until next Spring… our quilt show is in March.
Now, for the part to get you pondering. Is there a skill/technique that you didn’t think you would want to do. If you can, take a class, or a workshop, or attend a demonstration, or find a book, and learn it. You’ll be surprised with where it may lead you.
Have you ever wondered where some names for blocks come from? You probably are aware that some blocks have several names, dependent on where they originated or even where they were made.
The Puss-in-the-corner block does have a bit of history. It is actually based on a children’s game, a version of tag. There is a player in each corner, and the puss is in the center of a room. On an agreed signal the players attempt to move to the next corner. The puss tries to beat them to the corner. If the puss is successful, the player now becomes the puss.
Until our next quilting adventure. -Alice
Inspiration from amazing things…
Posted on: 29 July 2008
- In: quilting
- 4 Comments
What inspires you? Do you think about what inspires you? Or does it just sort of happen.
I was in the grocery store the other day picking up a few things, when of course I had to walk by the magazine rack. I looked, and saw one I was interested in, then saw a “bundle”. The Australian Quilting magazine back-issues are often bundled together for a savings on the magazines. You never know what they will be. This time I found a bundle which included Australian Patchwork Quilting Vol 14 No 11 and Australian Country Threads Annual Vol 7 No 6. I was thumbing through the Country Threads, and didn’t get past page 14.
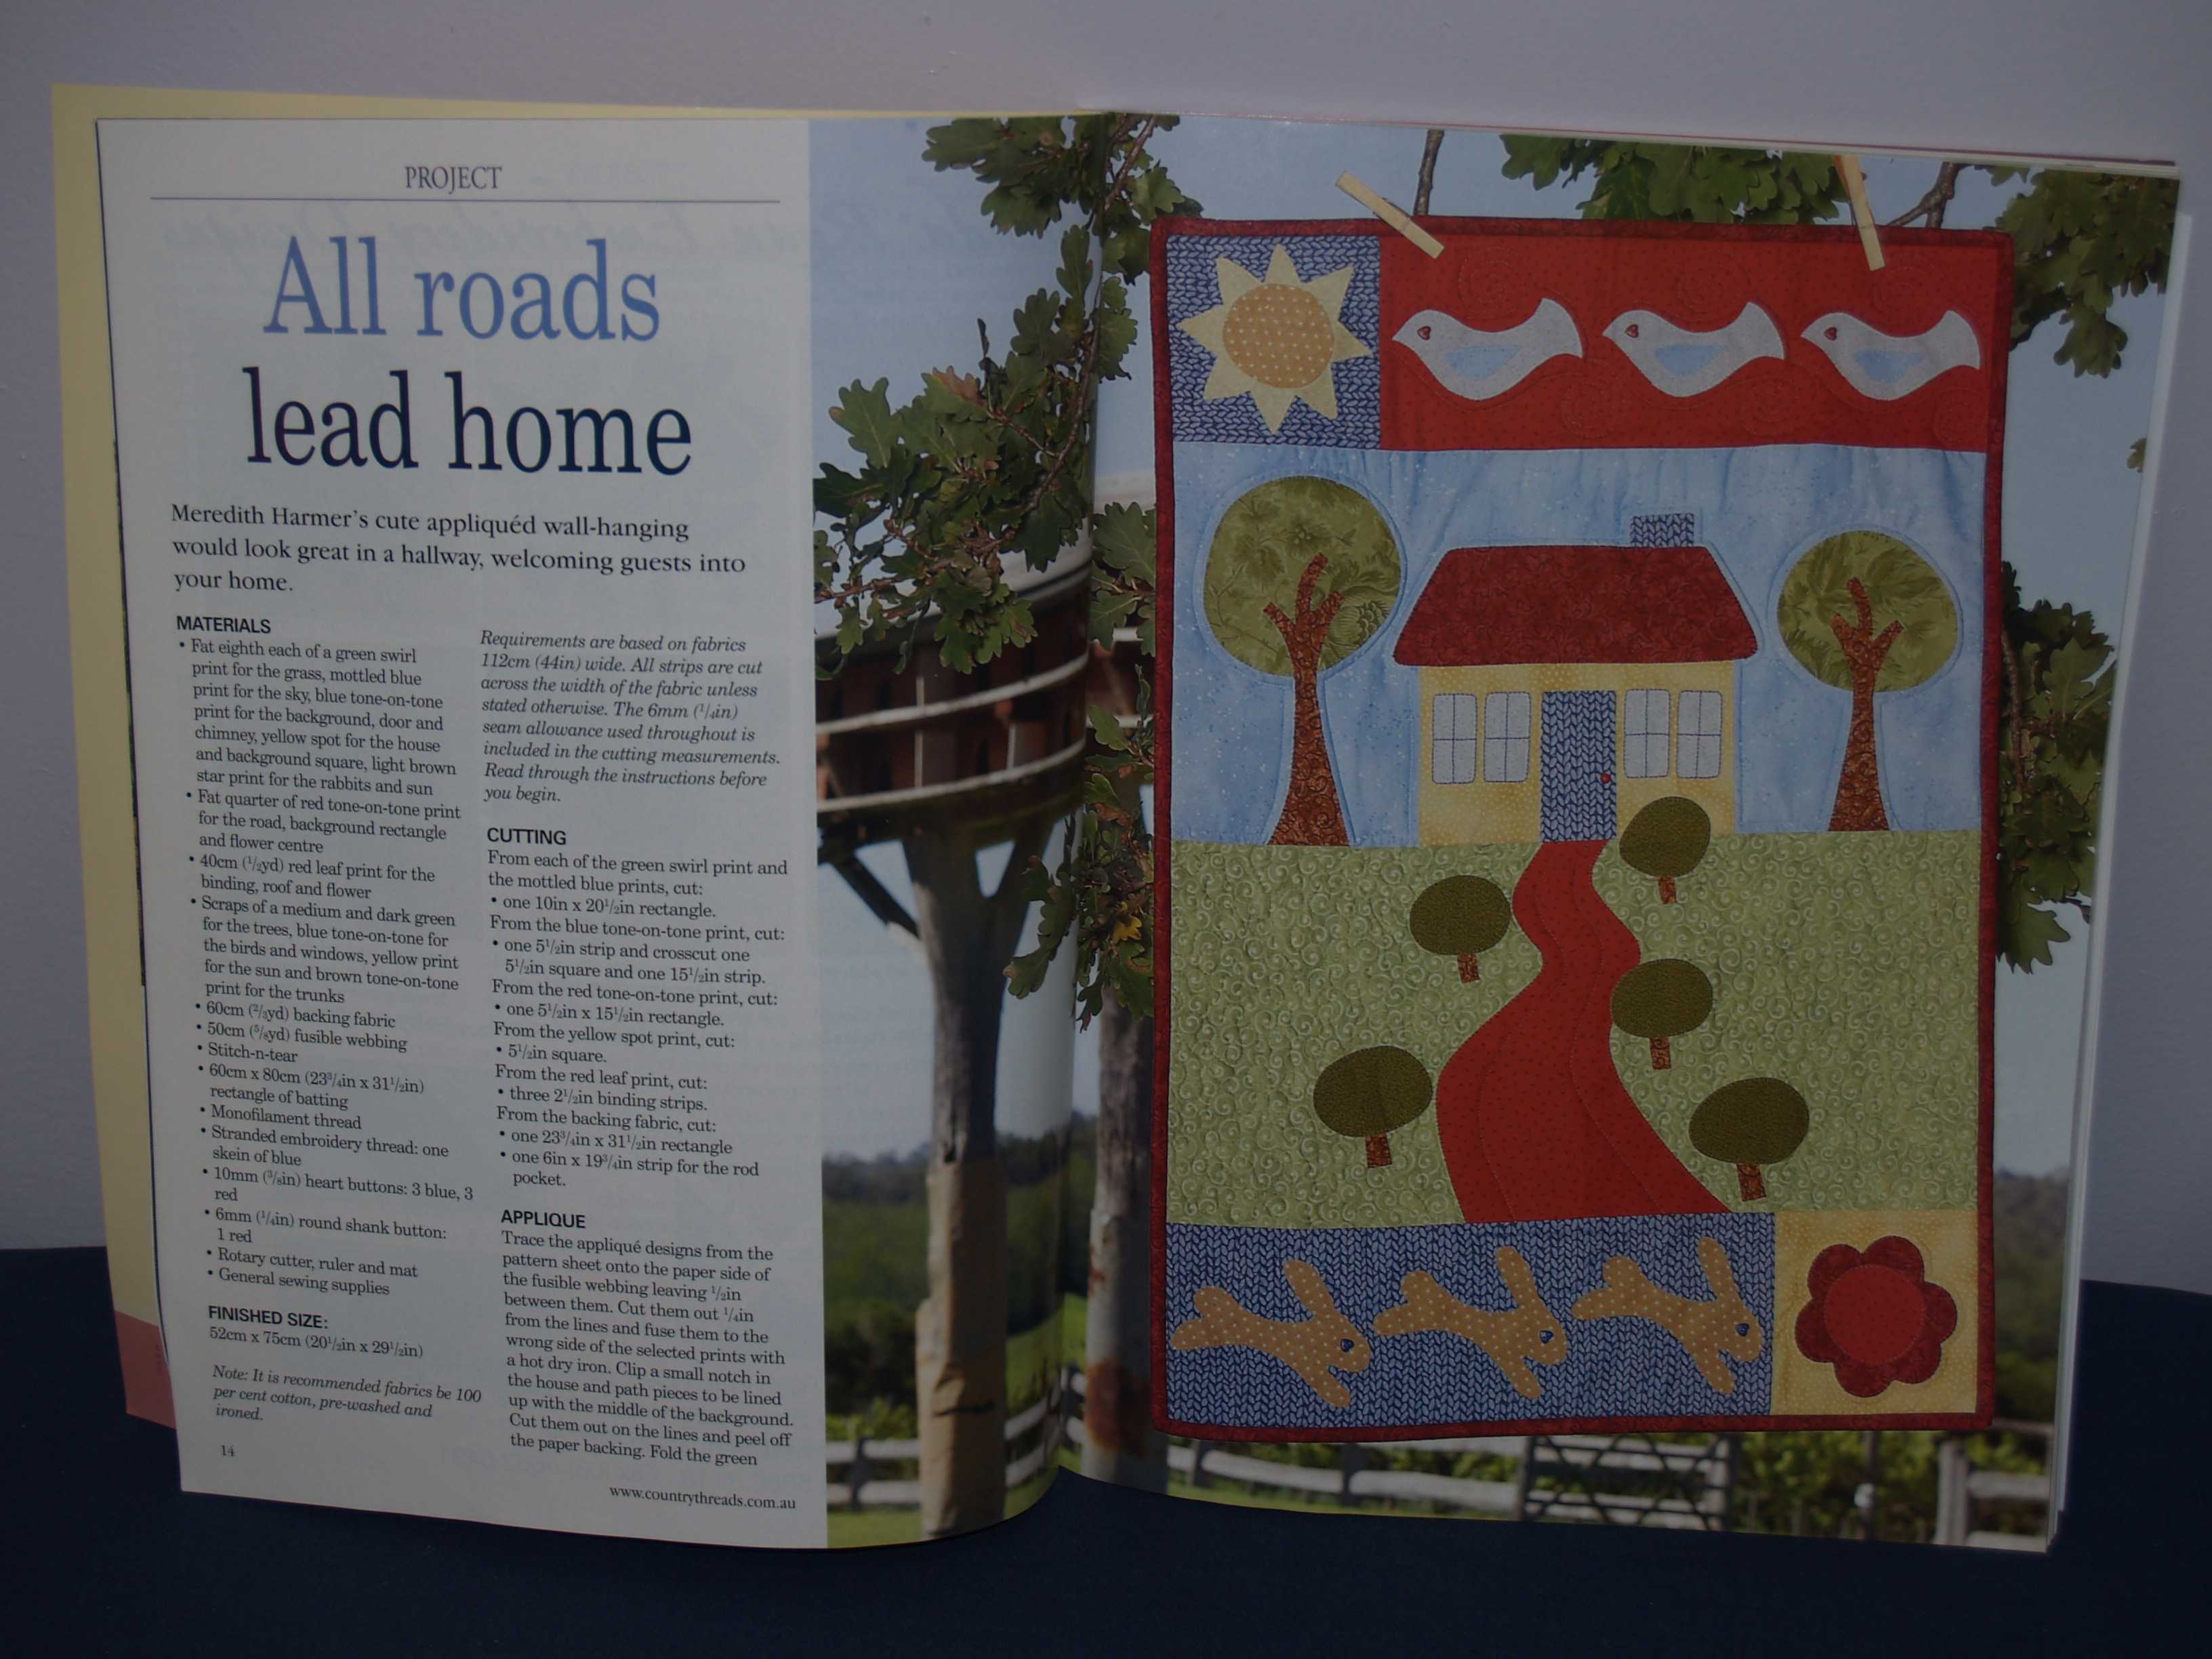
Australian Country Threads Annual Vol 7 No 6


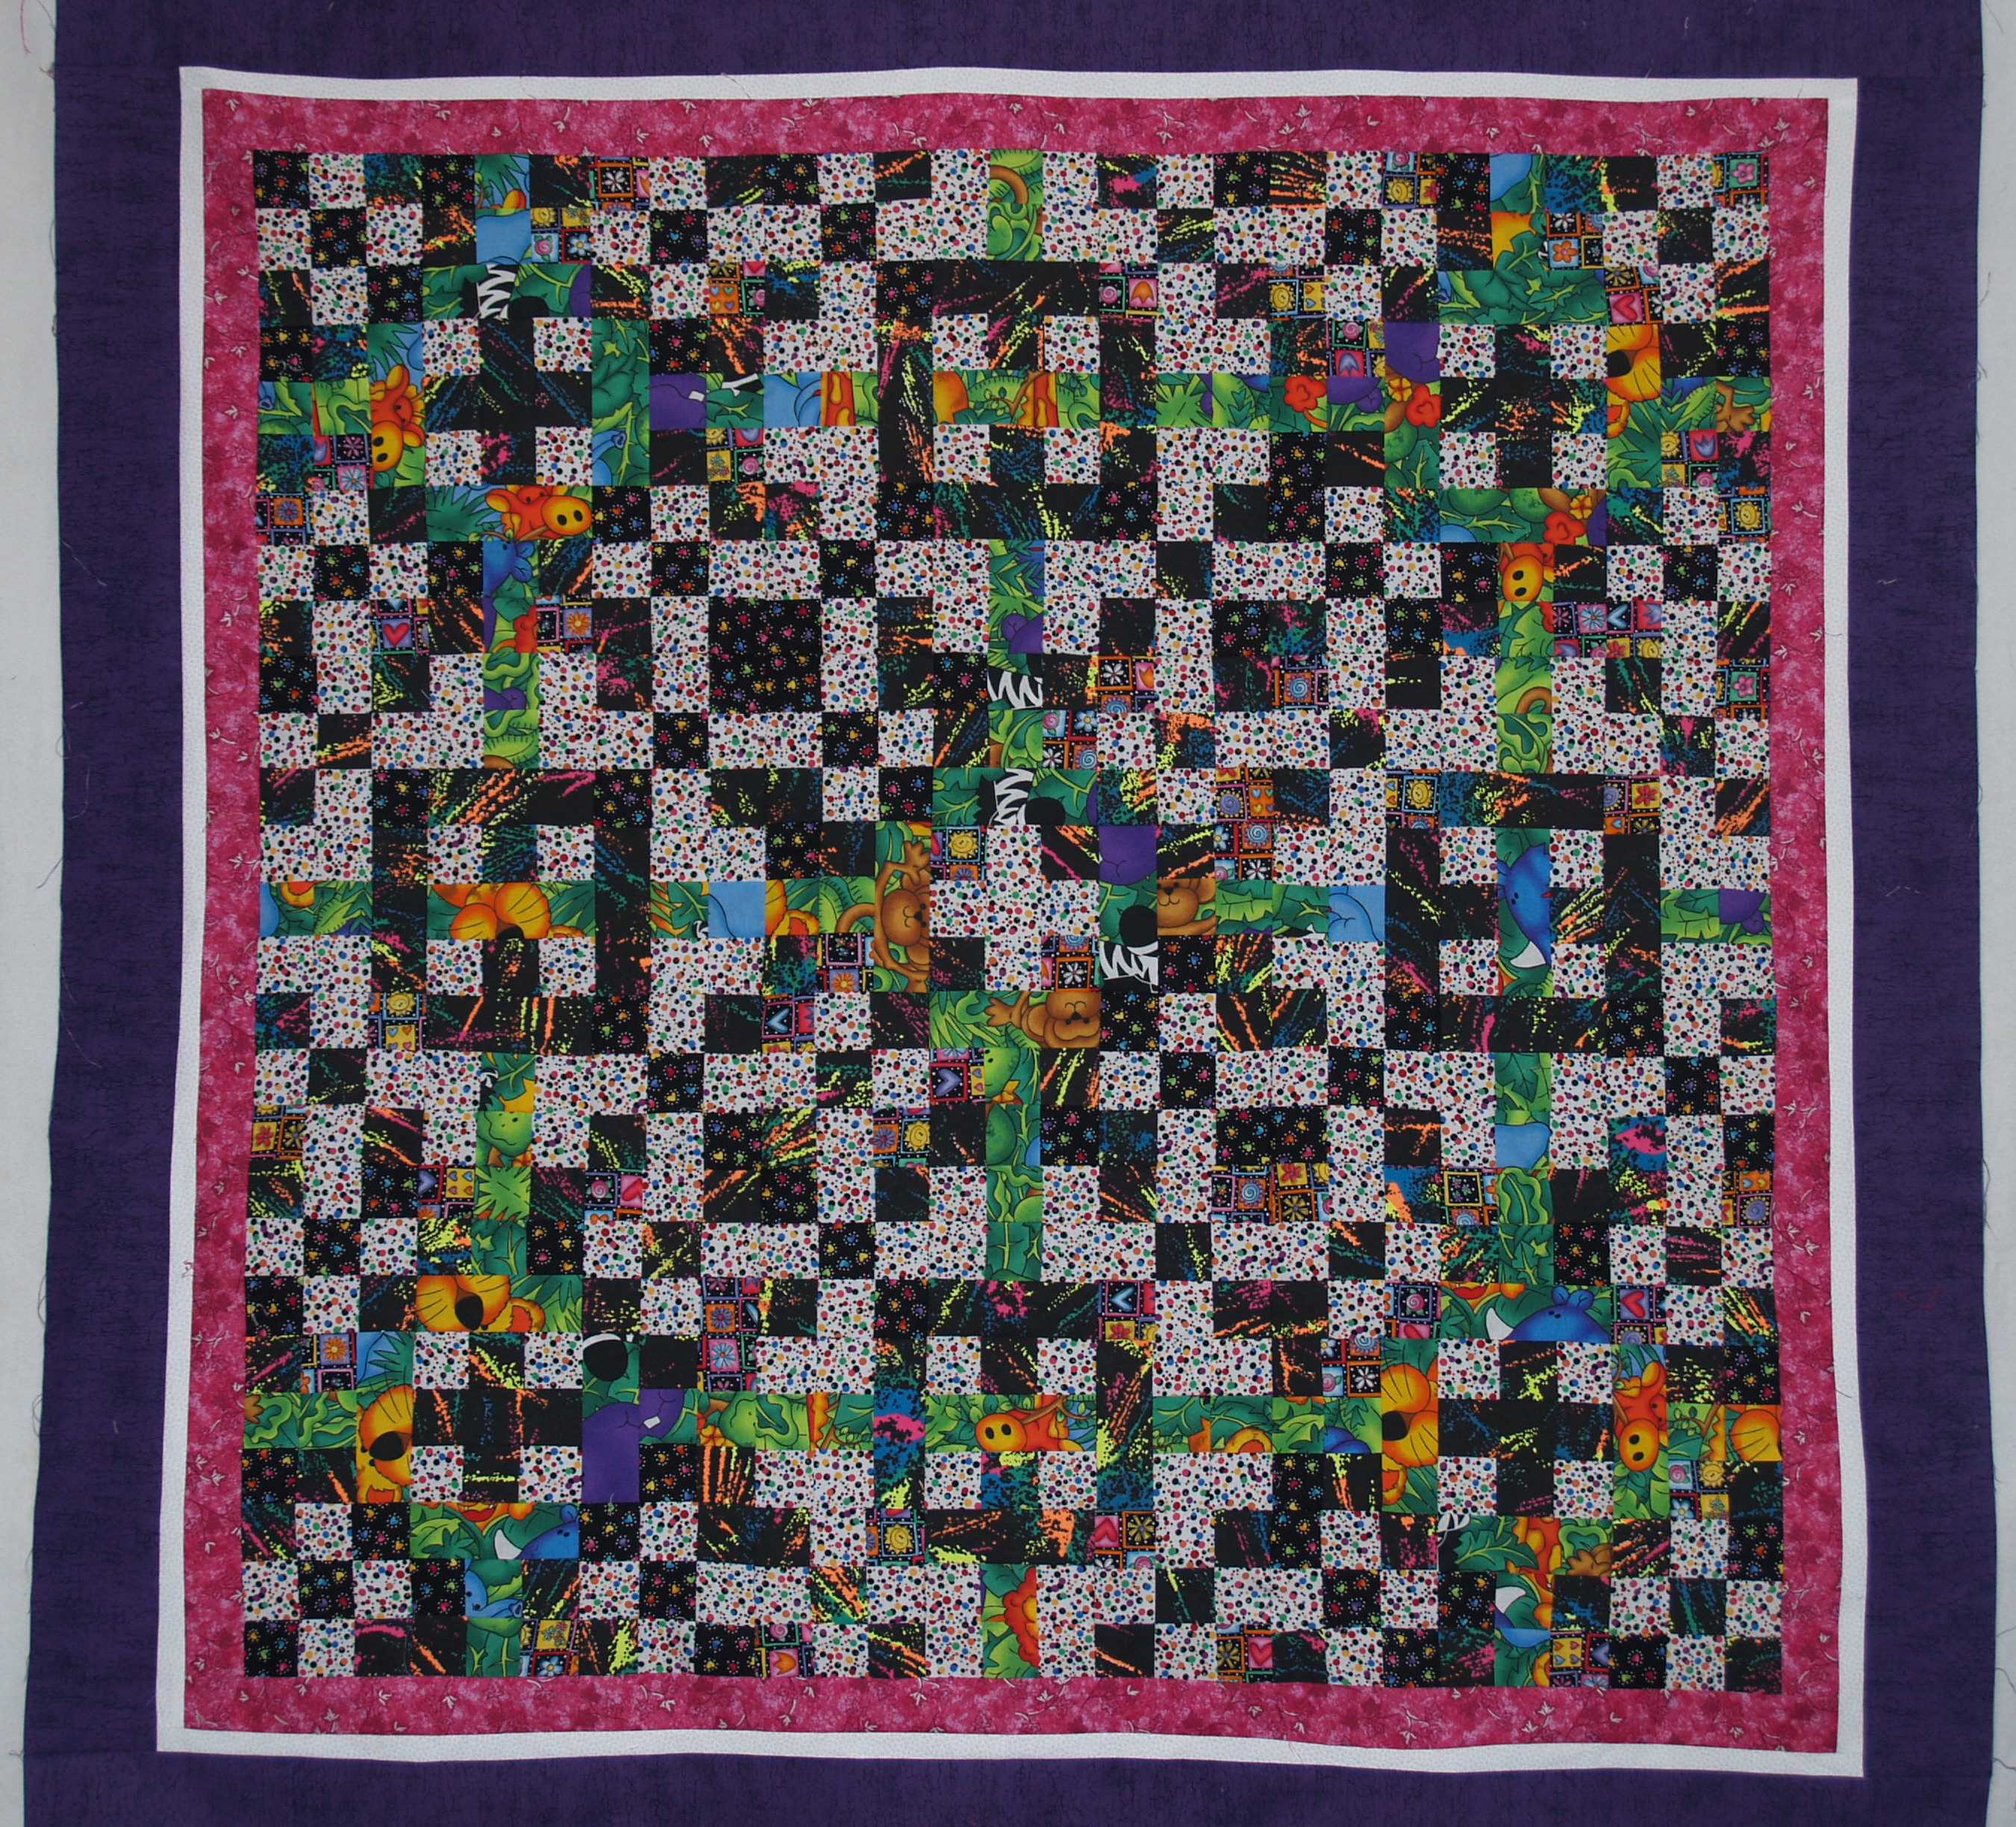 A friend gave my daughter the black with the neon colours and the green animal print. The remainder black and white fabrics and the border fabrics are from my stash.


On Being a Canadian
Posted on: 1 July 2008
- In: quilting
- 3 Comments

Being a Canadian means a lot to me. I am proud of my heritage. Our country is relatively young compared to others. Young at 141 years.
I find today that I remember those who have past before me. And I reflect on our members of the Canadian Forces, those that are currently on deployment, and even those who remain on our soil. And I think of the families, friends, anyone associated with the fallen. I am proud of all of them. I am proud to be Canadian. I can only imagine, and I can’t even do that all that well, what they have gone through.
I will be attending our local ceremony to celebrate today.
While wandering about on the internet, I found one project by Canadian Quilters – The Canadian Comfort and Remembrance Project. I had heard of this through my guild, but I had not been to the website. This website is truly touching. The personal stories of the quilt recipients truly touched my heart. But what really moved me, was the list of the Canadian Forces members who have been killed in the line of duty. To hear the reports that a member is the 76th member killed… is one thing. But to see this list, with a photo of the quilt cannot be described accurately in words. It is finding things like this, that make me proud to be a Canadian. Canadian Quilters gather to make the blocks and put the blocks together to make these quilts. It makes me proud to be a quilter among them.
There are many ways to celebrate our Nation. There are many symbols that we see as being truly Canadian. I found a site… 101 Things Canadians Should Know About Canada It began as a survey, and then developed into something a little bit more. According to the organizers they were surprised at what items made the list, and what didn’t.
If you are a Canadian, I hope you enjoy today, in what ever manner you choose! And I hope that you take a moment to reflect on those members of the Canadian Forces who have been killed on duty, who are not able to share today with us!


